

How To Draw A Four Legged Animal
How To Make a Block Mold of a Four Legged Animal
Overview
One of the more common mold making application questions that nosotros receive is how to mold and cast a four legged fauna, such as a horse with different leg positions and flowing tail. The key to being successful and subsequently getting a perfect reproduction is to know where to properly identify air vents and besides where to make your extraction cut line.
Mold Max® thirty is the mold rubber featured for this demonstration. The mold will be a one piece cutting block mold with air vents placed at strategic points to minimize air entrapment during casting.Smooth-Cast® 300 casting resin is then used to make an exact duplicate of the original model.
Materials Used in this Tutorial
- Hot Cook Glue Gun
- Blackness Marker
- Measuring Record
- Melamine Board
- Vacuum Chamber
- Mold Max 30
- Knife
- Smooth-Bandage 300
- Mold Straps
- Mixing Sticks
- Mixing Containers
Step i: Preparing Model
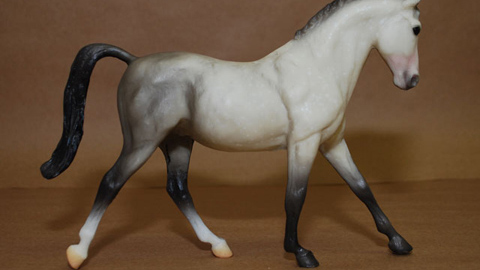
The original model is moderately complex with fine detail in the mane and facial features. In examining this model for potential problems we observed that the posed legs are non uniform; each contacted the base lath at a dissimilar angle. Once the model is completely encapsulated in rubber y'all will demand to know where to brand the extraction cut. 2 reference lines will exist drawn. The outset reference line is drawn with a marker along the underside of the horse from the oral cavity to the tip of tail.
Use hot cook gum to stabilize and secure the model to a base lath. To prevent air entrapment during casting, create air vents at strategic points on the model. In this instance, wooden dowels are glued in place at the tip of the tail and mouth. The second reference line is fatigued onto the base board mirroring the guide lines that were first drawn on the model. The line is extended a minimum of ii inches past the horse in both directions. This line volition transfer onto the surface of the mold prophylactic.
Measurements are taken and a mold box is built using iii/4 inch/ane.9 cm melamine board available at most Home Supply Centers. The interior dimensions of the box should be at to the lowest degree 10 inches/25.iv cm long, by four inches/10.sixteen cm wide, by vii ane/2 inches/19.05 cm tall. The mold box has a minimum of 1/two inch/1.27 cm clearance on all sides including the highest point of the model (the ears). The box is secured to the base of operations board with Hot Melt Glue. This will too ensure that the mold rubber will not escape at the interface.
Step two: Pouring Mold Max xxx
Mix Mold Max® thirty silicone safe, then vacuum in a vacuum chamber to remove air bubbles. Pour the material slowly into the everyman betoken of the mold box and allow it to seek its own level up and over the model. In one case the mold box is completely filled with Mold Max® xxx silicone condom, allow the material to cure a minimum of sixteen hours before removing the sides of the mold box.
Step 3: Demolding
Carefully carve up the base board from the mold. Gently release the points where the model and wooden dowels are fastened to the board.
EXTRACTING THE MODEL: The reference line drawn on the base of operations board has transfered to the mold rubber and is visible on the surface of the mold. A pair of helping hands is recommended during this procedure to concur the mold walls apart while cutting. Carefully cut the mold with a series of small-scale slices using the reference line every bit a guide. Piece of work your fashion through the Mold Max® xxx using the lines on the surface of the mold and model as guides. Proceed to make small conscientious cuts following the lines until the horse tin be comfortably extracted from the mold.
NOTE: Do not over cut the rubber mold equally this volition cause problems with alignment. Remove the original model from the Mold Max® 30 mold.
Step 4: Creating and Finsihing Casting
The Mold Max® 30 silicone mold rubber reflects perfect item captured from the original model. Use Two Mold Box boards from the long axis to support the rubber mold for casting. To secure the mold construction during casting, apply a mold strap as well. Mix Smoothen-Cast® 300 casting resin and slowly cascade it into the mold. Allow the Smooth-Cast® 300 to cure for a minimum of xxx minutes before demolding. Due to the thin leg sections on this model, the resin is allowed to cure for longer than indicated on the Technical Message.
Trim away the flashing with an Ten-Acto pocketknife. The Smoothen-Cast® 300 casting resin perfectly reproduces every detail of the original model and is set for post finishing. Casting companies effectually the earth know Mold Max® 30 silicone rubber as a production grade silicone capable of generating many castings.
Most Smoothen-On, Inc.
You may never have heard of u.s.a., simply you lot've seen our products at work. If you've ever been to the movies, admired a piece of sculpture, marveled at detailed architectural ornamentation or used a telephone; then you lot've encountered the handiwork of people who use Smooth-On rubbers, plastics, foams and other products to turn their ideas into iii-dimensional reality.
Acquire more about u.s. ›
Contact Information
5600 Lower Macungie Route
Macungie, PA 18062
Seminar Entrance
1725 Willow Lane
Due east Texas, PA 18046
Primary Phone and Order Desk
(610) 252-5800
or cost-gratis:
(800) 762-0744
Fax
(610) 252-6200
Contact Technical Back up
Source: https://www.smooth-on.com/tutorials/advanced-mold-making-technique-block-mold-legged-animal/
Posted by: proutopeashom96.blogspot.com
0 Response to "How To Draw A Four Legged Animal"
Post a Comment